Quite recently I had the pleasure to meet Robert. He built a version of the 6CB5A amplifier and wrote up a nice story about it. Now I am happy to hand the word over to him:
Greetings VinylSavor readers, I'm Robert from Switzerland and thanks to Thomas, I'm allowed to ramble a bit about my build of the 6CB5A based amplifier of which you can find various versions here. Before telling you about my experience building this amplifier, let me briefly tell you a bit about me.
I'm not what people would call an an old school audiophile, who only swears by vacuum tubes and technology from the past when "everything used to be better". I'm not the modern times equivalent either, who can spend hours trying to find out differences between power cords or USB cables... Actually by the usual definition I'm maybe not an audiophile at all: music just happens to be very important to me. So how did I get into this amplifier building endeavour then?
I've been tube curious for a long time and fascinated by electronics in general (I've got a computer science engineering background) and after going through several iterations of commercial solid state equipment for my two music systems I got more and more interested by the insides of the components and why some choices of topology, components or design were made. This usually brings one very quickly to the DIY "scene" which to me was like falling in the rabbit hole leading to Wonderland.
I suddenly discovered a wealth of smart people who were not only very knowledgeable in electronics, but had a real passion for exploring circuit topologies, components or ideas which were unusual, forgotten or commercialy not interesting for mainstream Hifi vendors. I was hooked.
I came across Thomas' web site during one evening while I was reading articles about LCR phono stages and spent hours reading his articles. The more I read, the more I wanted to build some components myself. I thought that ideally I should have a preamp, a phono stage and a power amplifier to make a complete home made system. However, at that point, I had zero practical experience and not even a soldering iron... so where should I start? I decided to start with a tube preamp kit using a PCB so that at least I could learn how to solder first. This was a success and after hours of patient assembly, it worked from the first time! The phono stage followed shortly after and, soon I've been able to listen to my first vinyl on a home made phono preamplifier!
At that point things became addictive: I had several options in front of me for the power amplifier and everything became possible: 300B, 2A3 or 45, interstage transformers, exotic rectification systems, etc... - all this fueled by the myriad of projects on Thomas's site. Since I already owned both a 2A3 as well as a 300B amplifier (commercial ones) I decided that I wanted to try something a bit more unusual: enter the 6CB5A amplifier.
I started discussing the options with Thomas and settled for my 6CB5A to be configured like this:
- Stereo build
- Interstage transformers
- Full wave tube rectification
- Lundahl iron
- I would design and build my own enclosure
After discussing the possibilities over email I decided to go and pick up the parts directly (it's a only a 3h drive). I spent the afternoon with Thomas and we had a really nice time discussing amplifiers, vacuum tubes and V8 engines. As you can see, it's all about the music!
The first thing one should know about Thomas' amplifiers is that choke filtering, massive power transformers and the necessary hardware are quite heavy. The weight of the wooden crate I left with that day should've clued me about the fact that I would have to manipulate it on my desk during assembly but at that point I was just happily going back home with my new toys.
The enclosure design
The first step needed was to design an enclosure that fitted the 40cm x 40cm footprint I already used for the preamplifier and phono stage. An additional constraint was that the box would have to be closed so that if necessary components could be stacked on top of each other. This is where I started to realise that a stereo version with an integrated power supply would become a monster of an amplifier. After lots of trial and error with the panel designer CAD application, I converged on the following design:
- A panel would split the enclosure horizontally at about 1/3rd of the height and components would be attached to it
- The PSU section would get it's own panel and would 'float' above the power transformer at the front
- The top panel would have an opening with a plexiglas insert to leave the interior visible
- The rear panel would have an opening open to let the heat evacuate from the back
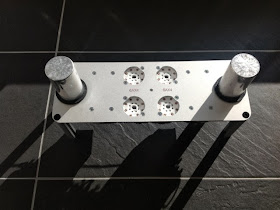
Panel 1: this is the power supply panel.
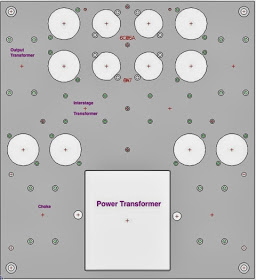
The bridge rectifier is built with the four 6AX4 TV damper tubes. To the left and right are the filtering chokes and towards the edges are the filter capacitors. Grounding has to be carefully routed from here to avoid ruining the excellent filtering offered by the LCLC filter.
Panel 2: the middle panel inside the enclosure (front is at the bottom). The various components are placed so that wiring is minimized and the big cut out allows the power transformer to be screwed to the bottom plate.
The PSU panel is mounted above the power transformer on aluminum profiles so that the 6AX4 tube sockets are about 1.5cm above the top of the power transformer. On each side are the additional, per channel, LC filters. The interstage transformers are in the middle of the panel and very close to the 6N7 tubes. Finally the output power transformers are at the back of the chassis nearby the outputs and the 6CB5A tubes. It's all very tight in there and I was really hoping I didn't make any mistakes on this very expensive panel!
All the smaller holes between along the middle of the panel are used to screw metallic standoffs for the various other components and also for running the ground cleanly across the amplifier from back to front.
Panel 3: the rear panel with the opening that allows hot air to escape.
The inputs use Neutrik sockets which are rather expensive but of excellent build quality, AC input filtering is done through a Schurter IEC inlet with integrated fuse holder. For safety reasons, all the metallic parts of the chassis are grounded at the IEC ground. Signal ground can be floated or not using the ground lift switch.
Panel 4: the front panel with the power button. I like clean and pure layouts so the front side is very plain. The power button is made by Schurter and has an integrated LED dot to indicate operation.
In addition to the above, there are top and bottom panels and the plexiglas window that will be shown further down in the final build pictures. All the aluminum panels were professionally made on a CNC in 4 mm anodized aluminum. Given the complex layout, the cost of the enclosure is relatively high and contributes to about 40% of the total bill of materials.
Building the amplifier
My components kit came entirely from Thomas (iron, sockets, tubes, resistors, capacitors) and I just had to add:
- Speaker connectors
- RCA input connectors
- IEC inlet
- Enclosure and associated hardware (aluminum profiles, screws, standoffs, washers, etc...)
- High quality wire: I used Alphawire only, 20 AWG / 600V for most of the build, 16AWG for the OPT to speaker connections, and solid 16AWG for the grounding - signal wire uses smaller 24AWG.
I started the assembly with the power supply board:
The LCLC filter can be seen below, with the wiring for the 6AX4 rectifier bridge. The aluminum profiles are cut at the appropriate length so that the bottom of the rectifier tube sockets are just above the power transformer.
I verified several times my connections to make sure that the anodes and cathodes of the diodes were connected correctly to avoid a smoky situation later on... Between the numerous filament wires and the bridge wiring, it's very easy to make a mistake. Of course due to the AC filament supply, those wires need to be cleanly twisted together to avoid hum contamination. The ASC caps are a pleasure to work with due to their very practical connectors that allow up to four connections to be soldered.
Note: the solid wire for the ground bus can be seen in green running along one side of the PSU panel and the cap on the right is the power supply 'exit' to the rest of the amplifier.
Next on the list came the main board with the remaining components: given that I didn't ask the panel edges to be milled clean they remain very sharp and will cut fingers at the first opportunity. That is the reason for the ugly tape around the corners of the panel which stayed until the end of the build:
I began the assembly by installing the tube sockets, screwing in all the transformers and doing the filament wiring. The blue heat shrink tubing is used to insulate the screws and nuts used to attach the tube socket to the board from the nearby electrical connection.
I made a mistake during the assembly of not using washers between the ceramic tube socket and the aluminum panel which leads to the result below. Morale of the story: sockets are fragile.
Several hours later (yes I'm slow), the main panel is almost completely wired:
It's very clear that the whole construction is completely mono on each side with only the power supply that's shared but decoupled through additional LC filtering (upper left and right chokes and caps). The other aspect that I like about this circuit is that no capacitors are used to connect the amplifier stages. The lower two capacitors on each side of the 6N7 and 6CB5A tubes are the 'ultrapath' connected capacitors.
A couple of additional close-ups of the main panel:
The next steps involve connecting the inputs and outputs from the rear panel to the rest of the circuit. This is the rear panel with the connectors installed:
The bottom panel is now needed as well with the power transformer. Thomas includes rubber bumpers in his kit to securely connect the transformer while decoupling it from the chassis so any eventual vibrations won't affect the rest of the amplifier.
First power up and basic circuit testing
Now that the main building blocks are ready, they're all brought together and like the kits I built previously I try to avoid problems by going through the following checks:
- Inspect visually the circuit by carefully following connections on the schematic and on the board after all the soldering is completed. I caught a few nasty mistakes by just doing that simple step.
- Make basic measurements in various places without power connected: Thomas offers a very good step by step pre-flight check for the 6CB5A amplifier in his articles and I've used that to double-check my own build. Please note that his measurements are for a capacitor coupled amplifier and some measurements won't match if it's transformer coupled version instead.
- Power up the filaments to verify that tube filaments are alright
- Power up the PSU and B+ without connecting it to the rest of the amplifier. I use a resistor load to make sure that the voltage doesn't go too high for the capacitors.
- Power up the amplifier with B+ connected. Here Thomas' power transformer is a fantastic asset: it has configurable output voltages and this is extremely useful when starting a circuit for the first time by being able to feed it a lower voltage.
- Finally power up with a high B+ and measure with an oscilloscope.
Filament and B+ all good - the first time power up is always quite exciting! As you can see I've temporarily wired the power transformer with a fused test lead that allows me to avoid having to touch anything during the first power up. It's very important to ensure that chassis metallic parts are properly connected to the IEC inlet ground before applying any high voltage.
It's alive! This is the first test of the amplifier output and it works nicely! I'm testing it with a low B+ (the red line sitting at about 180V) and in blue it's the speaker output showing the amplified sine wave coming from the signal generator. I immediately checked the other channel and it's working great.
Since I'm not very patient, I bumped up the power transformer voltage to 400V and directly connected it to my speakers - it had to play some music now :-)
I don't like to talk about how amplifiers "sound" because it's very personal and it depends a lot on the components around it but the first things I noticed are that it's very quiet, and it had serious bass. This was a bit unexpected because I was running it on my low sensitivity (92db/W/m, 4 ohm) speakers and I would have expected a single ended amplifier to struggle a bit with only 8-10W.
That is simply not the case, it sounds clean and solid with a deep musical bass foundation - a really good surprise! Worth noting too (but that's totally expected): this amplifier has a relatively low sensitivity and depending on the source may require a real preamplifier with gain instead of the modern equivalents which mostly perform attenuation.
Once I was happy that everything worked as it should, I completed the build by adding the wooden side panels and the remaining bits and pieces.
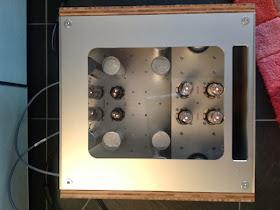
Completed 6CB5A amplifer with the bamboo wooden panels and the top plexiglas window:
Top view: in the evening it looks like a Christmas tree - very nice!
Rear view on the 6CB5A tubes. A lot of heat is pouring out from the back confirming the decision to leave a large opening as being a good one. Tubes can be replaced from the back without opening the top of the enclosure. I'm running the power transformer at 525V secondary (primary on 240V) and the plates of the 6CB5A are fine when I ran the amplifier at my place. However when connected to higher mains voltage (at a friend's place where mains are 10-15V higher for some reason) the 6CB5A plates started glowing a deep red meaning that I will have to rewire the power supply to the 500V secondaries at some point.
Top view: very nice view on the tubes and the inside. However one must make sure not to drop anything inside the case!
Summary and what's next?
I really had a lot of fun building my first power amplifier based on the 6CB5A kit. On top of it I learned a lot and the results are way above my expectations sonically speaking: it's a really great amplifier and in many ways I prefer it to my commercial 300B amp (an Allnic). If I were to do it again, I would probably consider separating the power supply from the amplifier chassis to make it less heavy to move around. This is something that Thomas does for most of his designs and it makes a lot of sense.
I've tried the 6CB5A in various setups with both high sensitivity (101db/W/m) as well as low sensitivity speakers, with solid state and tube preamps and I came to the conclusion that for the price it's extremely good. Even when not taking price in consideration, it's a fantastic amplifier design that's well in the league of commercial components costing 4-5x more. And then there are options that can make it even better: my 6CB5A uses all Lundahl iron but other more exotic magnetics can be used to further improve the performance.
Given the sound quality, I'm now thinking about pairing it up with a preamplifier that's sonically better matched than my home made 6SN7 preamp, and one of my next projects will involve Thomas' 6AH4 based job with transformer volume control.
Thank you Thomas for sharing with us your passion - it's really appreciated!
- Robert
Thanks Robert for the great write up and congratulations for the beautiful amplifier!
Best regards
Thomas


Wonderful build Robert, thanks for sharing. Where did you find those nice extrusions and screws for your chassis? That's inspiring...
ReplyDeleteHi Bjorn,
Deletethe aluminum extrusions come from KJN in the UK. They have various sizes and accessories. I got mine cut by a machine shop to the necessary length.
The screws come from the Lightech motorbike racing parts catalog. They have various sizes, lengths and colors available.
Hope this helps!
Robert
Robert, great work – congratulations!
ReplyDeleteWould you mind telling us which Hardware and Software you used with/on your Mac for the measurements?
Best,
Peter
Hi Peter,
DeleteI'm using a PicoScope 4262 high resolution oscilloscope and running it on Windows 8 virtualized on my Mac.
For safe HV measurement I use a 1400V differential probe (coming from PicoTech as well) and for every other measurement I use the standard probes.
The nice thing about the 4262 is that it has a signal generator and can also measure THD, IMD and other useful parameters.
- Robert
Many thanks, Robert!
DeleteThis seems to be real scientific precision gear you use – worth taking a closer look at.
Enjoy your amp & music,
Peter